Tolly Dolly Posh Fashion
Tolmeia Gregory New Site
Browsing Tag

photoshop tutorial

Making 10 Year Old Tolly’s Ideas Come To Life…

By June 20, 2015 DIY & Lifestyle

“Dear my little earthlings,” was how I used to introduce my posts on my old Tumblr blog when I was 10… yup, most of you won’t know but I was still blogging back then. I used to write super short and simple posts to an audience of around…. 0? So, when I was recently sorting through some of my old bits and bobs, I discovered an old Tumblr/blogging notebook which was pretty much half empty. What was in that notebook you ask?

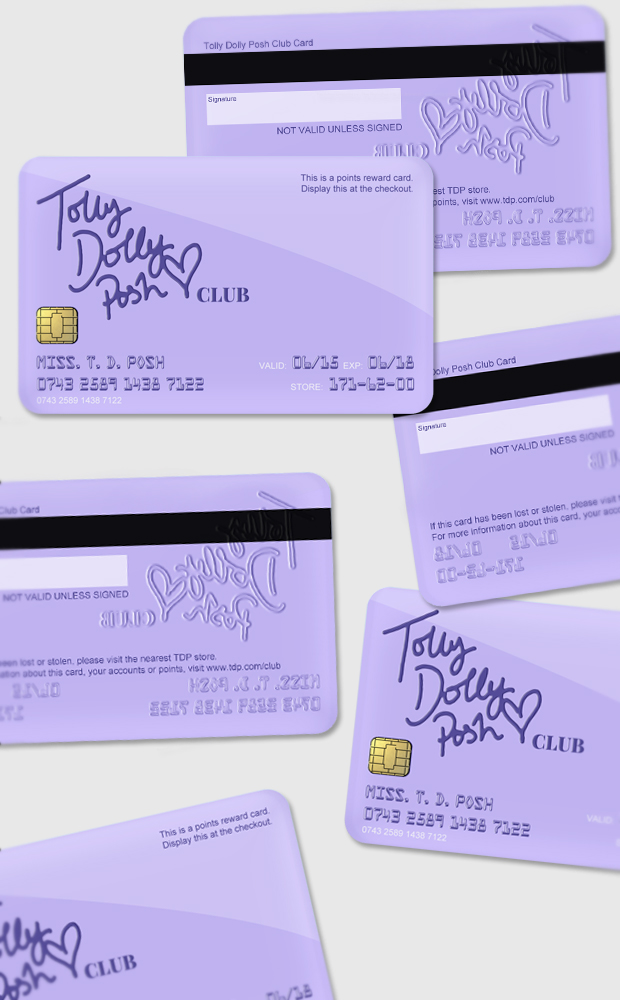
Tolly Dolly Posh Digital Club Card Mock-up Photoshop

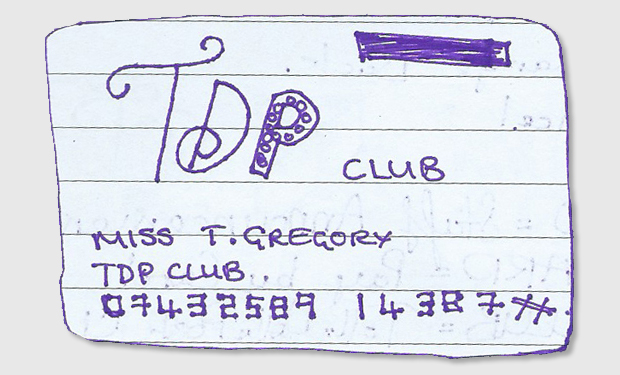
In my super duper, pretty much empty notebook I found a few odd (and pretty darn awful) sketchy drawings of ideas for my future as “TDP”. Back then (LOL, I’m talking about it as if it’s been twenty years) I had more of a vision of being this sort of cool, hip, high street store so the ideas I had were really based around that kinda’ thing. I drew a scribble of a cash register (with even descriptions of what some of the buttons meant) and some ideas for the price tags for both men’s and women’s clothes.

So, I was like… It’s been over five years since I created them, so why not make my “10 year old TDP” ideas come to life? So I did! I fiddled around on Photoshop, tweaked the Bevel & Emboss settings and added all the right components for a… Tolly Dolly Posh Club card! Yeah that’s right, a points card… 💳

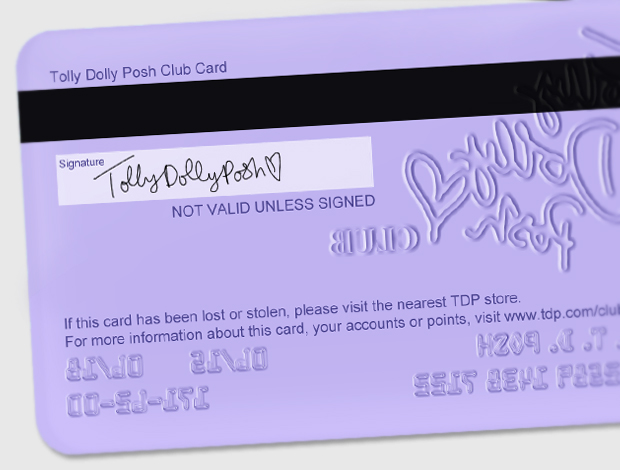
Tolly Dolly Posh Digital Club Card Mock-up Photoshop

After fiddling around for a while, I came up with the design above. It looks a lot different from the original drawing (below), but what I do like is the fact that I was using purple back then… and purple is one of my main branding colours now. Anyway, what do you think? I’m actually really chuffed with how it came out. I did try to make the price tags but the original design was so bad that it just didn’t look right at all. But, I think 10 year old Tolly would be impressed… if I do say so myself…!

Tolly Dolly Posh Digital Club Card Mock-up Photoshop

So, don’t go throwing away those silly little notebooks full (or well, half empty) of scribbles and future ideas. Keep them not only to reflect on how your skills have developed, but to remind you of where you’ve come from for when things start changing or moving in the future. I’m glad that I looked back on these funny ideas I had and made them come to life. Maybe one day they’ll be a real thing?! Who knows? I guess that’s the cool thing about blogging… it’s a place where all your memories and thoughts can be stored forever, in the form of a creative hobby.


💳 What do you think of my Tolly Dolly Posh Club card mock-up? Have you ever taken something from the past and made it come to life again? Let me know in the comments! 💳 

You Might Also Like

How To Create Your Own Outfit Collage Template

By February 7, 2015 General

As you will know, I love outfit posts. I love reading, writing, creating and drooling over them, so I thought I would help you guys out. I know how annoying it is to go onto another website and have to put together a collage, or put two images together, exactly central etc etc, so I’ve come up with an 8-step tutorial on how to create your own outfit collage template, to use time and time again! You can do this in either Photoshop or Pixlr, but today I’m using Photoshop CS4 (on Windows).

How To Make an Outfit Collage Template in Photoshop


STEP 1

Create a new transparent file. Make sure it’s the correct size you want, because it’s easier than re-sizing it at the end. Just in case you are wondering, all my blog images are 620px wide.


How To Make an Outfit Collage Template in Photoshop


STEP 2

Select the line tool. You may want it to have some sort of effect on it, maybe you want it to look like a paint stroke? Fiddle around and see what you think works best! I prefer just a simple straight line.


How To Make an Outfit Collage Template in Photoshop


STEP 3

Choose your preferred colour. I chose white as it blends well with my blog’s background, making it look like the images are separated by formatting.


How To Make an Outfit Collage Template in Photoshop


STEP 4

Choose the weight/width of your line, this can be as thick or as thin as you want. I went for 10px wide in Photoshop.


How To Make an Outfit Collage Template in Photoshop


STEP 5

Draw your straight line. You don’t need to center it at the moment, just concentrate on making sure it’s perfectly straight! Easy as pie.


How To Make an Outfit Collage Template in Photoshop


STEP 6

Press Ctrl + A (Select All), then go to Layers, then Align Layers to Selection, clicking on Horizantal Centers. This will make sure it is dead straight in the middle. Of course, if you want it slightly off center, then just drag it to where you want it, and ignore this step.


How To Make an Outfit Collage Template in Photoshop


STEP 7

You then want to right click on the line’s layer, and click on Rasterize Layer. This sort of flatten’s the layer so that it’s easier to manage.


How To Make an Outfit Collage Template in Photoshop


STEP 8

The last step is to save your file as either a .PNG or a .PSD. You may want to save it as a .PNG file so you can open it in other softwares when you don’t have Photoshop to hand… just as long as it is transparent then you’ll be fine!


~ HOW TO USE YOUR TEMPLATE ~

So obviously, you are wondering…. so how do I use my template? Well, it’s super simple. Follow these four simple steps and you’ll have your very own, personalised, template for outfit pictures (or anything else, pictures)…

How To Make an Outfit Collage Template in Photoshop


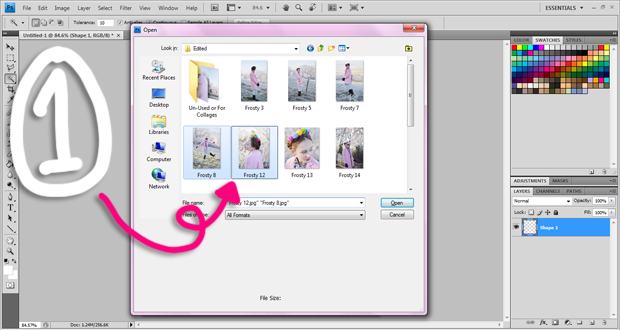
STEP 1

Open up your file, and the two images which you wish to put side by side. I usually go for either 2 full lengths, or 1 full length and a detail!


How To Make an Outfit Collage Template in Photoshop


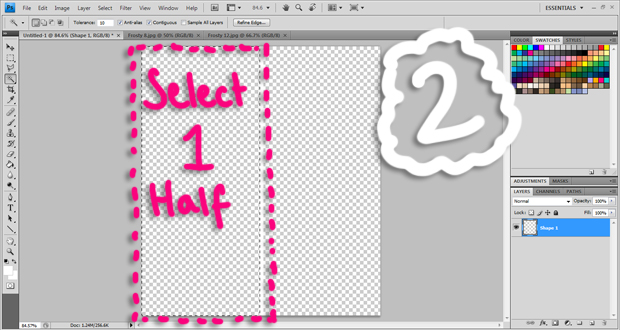
STEP 2

Go to your template file, and select one half of the template (make sure you haven’t selected your line down the middle).


How To Make an Outfit Collage Template in Photoshop


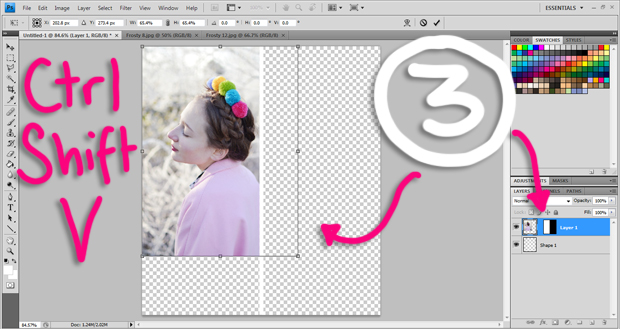
STEP 3

Copy one of the images you opened up, go back to your template, and press Ctrl + Shift + V (Paste Into). This will put the image into just that one half. Drag and re-size the image to how you want it to look. The bits of the image that aren’t visible, go underneath the line and aren’t deleted, so you can move it around a bit afterwards!


How To Make an Outfit Collage Template in Photoshop


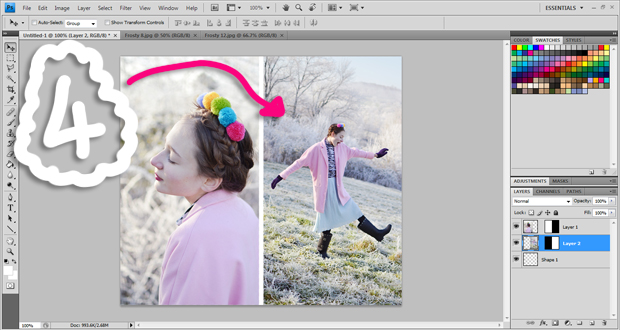
STEP 4

Repeat with the over half, selecting and pasting into the correct space… and voila! A perfect outfit template.

To make this even more personalised or custom, you could add more lines to create a grid, or have an image floating in it’s own space. It’s really all down to ‘Paste Into’, so you can be really creative with it! Good Luck!


HOW TO TAKE OUTFIT PICTURES // OUTFIT PICTURES FEATURED


You Might Also Like